KSmRover
Project goal
- Control the robot from any mobile device through the brower.
- When a camera is available, show live video feed and control the robot by pointing in the video screen.
- The application must be able to run on both the EV3-brick and the PiStorms.
You can find the full code on Github. See the README.md file for more information on how to start the application.
Set-up
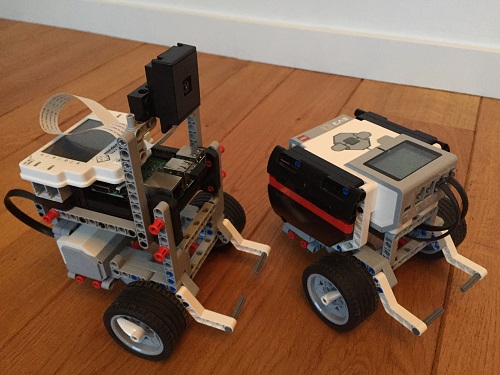
- LEGO EV3-brick, or
- Mindsensors PiStorms v2 (on RPi 3B) with Picamera
- Two LEGO EV3 LargeMotors
- ev3dev operating system
- Python
- Flask
Control the robot through the browser on mobile device
Be sure to boot the EV3-brick or PiStorms on the ev3dev operating system.
To meet the first goal I decided to build a Flask application. A great help for me was the The Flask Mega-Turorial by Miguel Grinberg. I found out that even on the EV3-brick it is possible to install and run Flask. Performance is just enough, although it takes considerably longer to start up on the EV3 (about 90 seconds) then on the RPi (few seconds).
Install Flask:
$ sudo apt-get update
$ sudo apt-get install python3-flask
Miguel’s tutorial will give you enough information about the structure of the application.
To control the movement of the robot, I decided to use MoveJoystick in ev3dev2. The application builds a webpage wioth a circle acting as a joystick. When you hold your finger in the center of the circle, it means the joystick handle is in rest. Moving your finger up is like pushing the joystick handle forwards. And so on.
You can display a circle in HTML using the dot class:
<style>
.dot {
    height: 500px;
    width: 500px;
    background-color: green;
    border-radius: 50%;
    border: 2px;
    display: inline-block;
}
</style>

<span class="dot" id="circle_ui"></span>
To react on touch movements from the user, event listeners need to be defined in the JavaScript code in the HTML-page:
function startUp() {
    var el = document.getElementById("circle_ui");
    el.addEventListener("touchstart", handleStart, false);
    el.addEventListener("touchend", handleEnd, false);
    el.addEventListener("touchmove", handleMove, false);
}
The startUp function is called when the page is loaded (window.onload=startUp;). The touch events are linked to the joystickcircle (id=”circle_ui”). When the user puts his finger on the screen the function handleStart is called. When the finger moves around on the screen function handleMove is called. And when the finger is released from the screen function handleEnd is called.
Most important is the handleMove function:
function handleMove(evt) {
    // Handle moving of touchpoint
    evt.preventDefault();
    var touches = evt.changedTouches;
    var i = touches.length-1;
    var x_touch = touches[i].pageX - x_center;
    var y_touch = y_center - touches[i].pageY;
    if (Math.abs(x_last - x_touch) > delta ||
        Math.abs(y_last - y_touch) > delta) {
        // Send data to robot
        $.post('/touch_circle', {
            x_touch: x_touch,
            y_touch: y_touch
        }).done(function(response) {
            document.getElementById('position').innerHTML = response['position'];
        }).fail(function() {
            document.getElementById('position').innerHTML = 'fail';
        });
        // Save coordinates of last handled touch
        x_last = x_touch;
        y_last = y_touch;
    } else {
        document.getElementById('position').innerHTML = '[' + str(x_touch) + ',' + str(y_touch) + ']';
    }
}
When a touchmove event occurs function handleMove is called. First, this function prevents the page doesn’t scroll when the touch-position changes by calling evt.preventDefault(). Then it reads the last touch-position from the buffer. To prevent the server application on the robot will be overloaded with data, the new touch-location will only be sent to the robot when the touch-position changed significantly (using delta). This is also useful when the wifi connection is slow, it prevents the robot reacts too slow to your commands.
The new position is sent to the robot by using the post command to URL /touch_circle. In the file routes.py on the robot the decorator @app.route(‘/touch_circle’, methods=[‘POST’]) associates the URL /touch_cirle with function touch_circle():
@app.route('/touch_circle', methods=['POST'])
def touch_circle():
    x = int(request.form['x_touch'])
    y = int(request.form['y_touch'])
    joystick_robot.robot.on(x, y, max_speed=100.0, radius=500.0)
    position = '(' + str(x) + ',' + str(y) + ')'
    return jsonify({'position': position})
This python function passes the data to an instance of the JoyStickRobot class which in turn uses ev3dev2.motor.MoveJoystick. This makes the robot move in the given direction. See the documentation of MoveJoystick for further explanation about this method.
When the finger is released from the screen, a touchend event occurs and function handleEnd is called. It takes care both motors stop:
function handleEnd(evt) {
    // Handle release of touch
    evt.preventDefault();
    stopMotor();
}
Control the robot through touch interface in video feed
Again, a tutorial of Miguel Grinberg was of great help for me: Flask Video Streaming. Read this tutorial to understand how to stream video from the picamera. Controlling the robot is the same as described above only now the touch events are linked to the video feed. This gives an intuitive way to control the robot and send it to the right location, even when it is in a different room than you are!
Run both on EV3-brick and PiStorms/RPi
I have already mentioned that Flask runs both on the EV3-brick and PiStorms/RPi. There is one difference: starting the application on the EV3-brick takes significantly a lot more time than on the PiStorms/RPi.
In my case only the PiStorms robot has a camera. Thus when using the EV3-brick, the camera interface must be hidden in the application. This is done by checking the platform with ev3dev2.get_current_platform(). This check is done in routes.py and the platform type is passed to each render_template function.
Further information
- The Flask Mega-Tutorial by Miguel Grinberg.
- The Flask Video Streaming Tutorial by Miguel Grinberg.
- Python ev3dev2 documentation.
- ev3dev webpage.
